Grout plays a vital role in keeping bathroom tiles secure, sealed, and visually appealing. Over time, grout may crack, fade, or loosen from continuous exposure to moisture, cleaning products, and daily use. When this happens, the tiled surface loses both its strength and charm. That’s why knowing the right grout removal tool and using an effective grout remover becomes so important.
If you’ve noticed cracked or missing grout lines, learning how to repair bathroom tile grout can save you from expensive renovations. Whether you’re tackling minor touch-ups or full tile joint replacement, understanding the basics of how to repair grout ensures durability, safety, and a refreshed look for your bathroom.
1. Understanding Grout and Its Importance
Grout is a cement-based mixture used to fill the gaps between tiles, locking them securely in place while preventing water and dirt from seeping underneath. In bathrooms and kitchens, where moisture is always present, grout works as a protective barrier. A strong grout line not only maintains the structural stability of your tiles but also enhances the overall appearance by giving them a neat, polished finish. Without grout, tiles can shift, crack, or allow hidden water damage to occur.
Unfortunately, grout is highly vulnerable to wear and tear. Constant exposure to moisture can weaken it, creating small gaps that invite mold and mildew growth.Cracks in grout commonly develop from everyday wear, fluctuations in temperature, or improper installation. Over time, dirt buildup and harsh cleaning products can discolor or erode grout, making even the cleanest bathroom look unkempt.
2. Tools and Materials You’ll Need
To successfully remove or repair grout, having the right tools and materials is essential. For small jobs, a manual grout removal tool like a scraper, grout saw, or utility knife allows precise control. Larger projects are easier with power tools such as an oscillating or rotary tool, which speed up the removal process. In some cases, using grout remover liquids can soften stubborn grout and make the task less labor-intensive. Along with tools, proper safety gear is a must-gloves, goggles, and masks protect you from sharp debris and harmful dust. Always ensure good ventilation in bathrooms when working with chemical grout removers to maintain safe breathing conditions.
Essential Grout Removal Tools
Removing old grout requires the right equipment for efficiency and safety. A manual grout removal tool like a scraper or grout saw works well for small areas, while power tools such as oscillating or rotary tools save time on larger sections. For stubborn grout, grout remover liquids can soften the material, making removal easier without damaging the surrounding tiles.
- Manual grout removal tool – A grout saw, scraper, or utility knife is ideal for small repair jobs. These are affordable and allow precision when working on narrow joints.
- Power tools for grout removal – For larger areas or stubborn grout, an oscillating tool or rotary tool speeds up the process and reduces effort.
- Grout remover liquids and solutions – Chemical removers help soften old grout, making it easier to scrape away without damaging surrounding tiles.
Safety Gear Before You Start
Before beginning grout removal or repair, always prioritize safety. Wearing gloves protects your hands from sharp tools and chemicals, while goggles shield your eyes from flying debris. A mask is equally important to avoid inhaling grout dust or fumes from grout remover solutions. Additionally, keeping the bathroom well-ventilated helps maintain fresh airflow and prevents breathing discomfort.
- Gloves, goggles, and masks – Protect your hands, eyes, and lungs from sharp fragments, dust, and chemical exposure.
- Proper ventilation in bathrooms – Always keep windows open or use an exhaust fan when working with grout remover solutions to avoid inhaling fumes.
3. Step-by-Step: How to Repair Bathroom Tile Grout
Repairing bathroom grout starts with a careful inspection to spot cracks, loose sections, or moldy patches. Once identified, the damaged grout must be removed using a manual grout removal tool for small areas or power tools for larger jobs, while grout remover solutions can soften stubborn spots. After removal, the joints should be cleaned thoroughly to eliminate dust and moisture. Fresh grout is then mixed to the right consistency and applied evenly with a grout float, ensuring smooth and sealed lines. To finish, applying a grout sealer protects the surface from water, dirt, and mold, keeping the bathroom tiles strong and looking fresh for years.
Step 1: Inspect the Damaged Grout
Begin by examining the grout lines carefully. Look for cracks, gaps, or loose pieces that may weaken the tiles. Also, check for moldy or discolored areas, as these indicate moisture problems that need attention before repairs. Identifying the problem early ensures you fix the right spots.
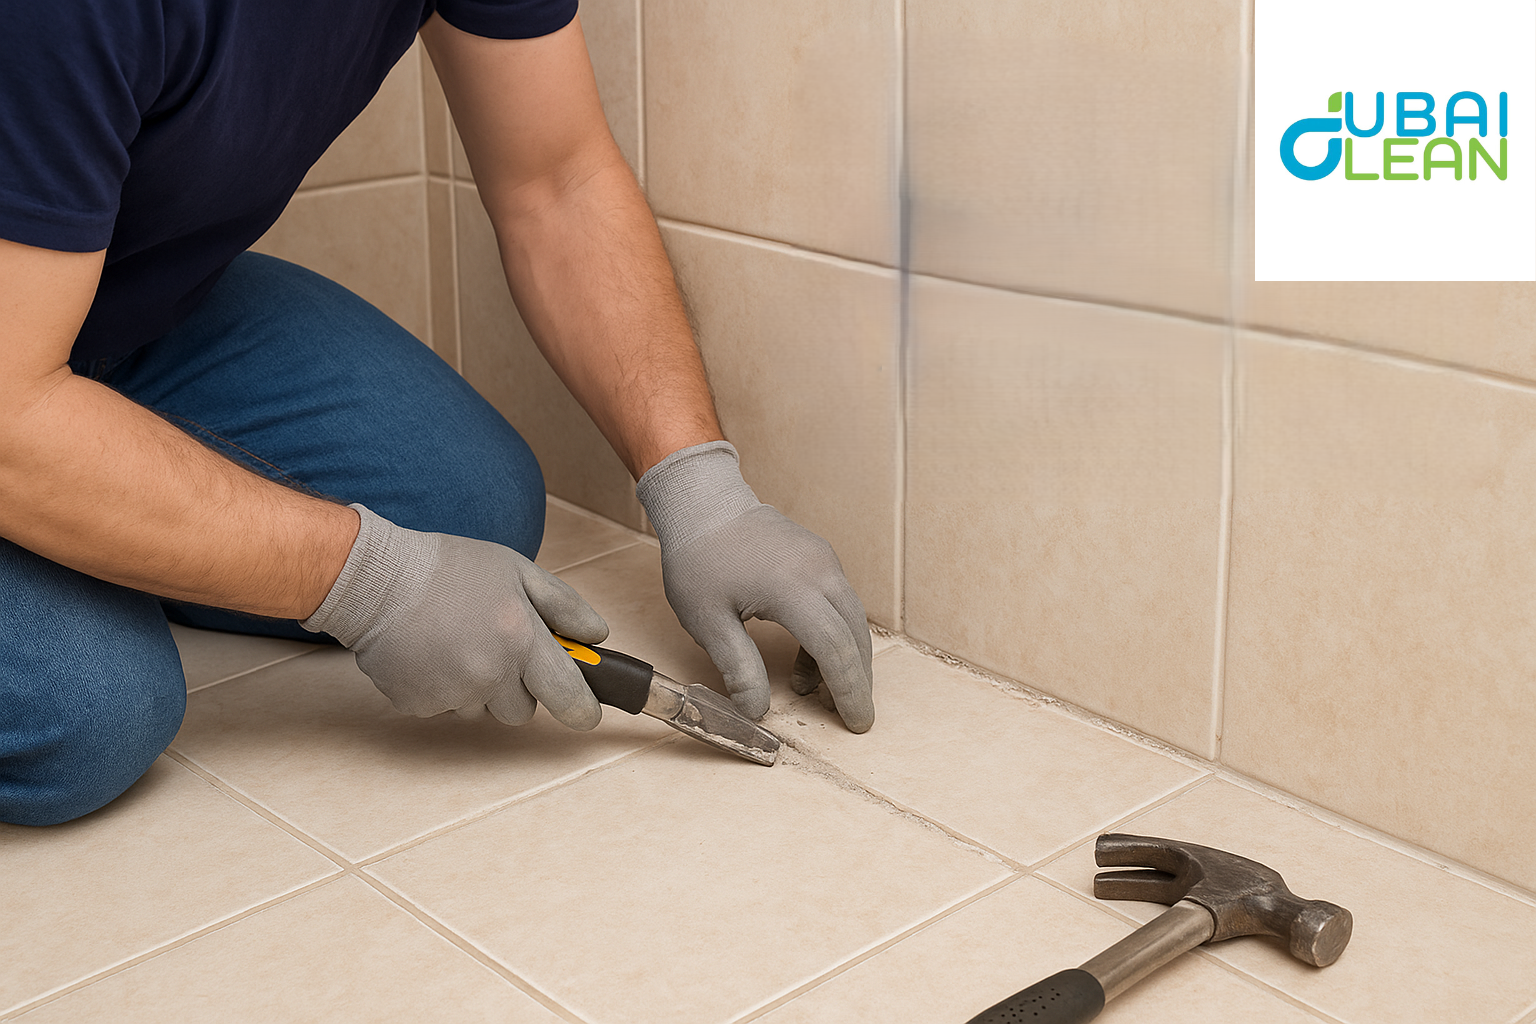
Step 2: Remove Old Grout Safely
Once the damaged areas are identified, use a manual grout removal tool like a scraper or grout saw for small repairs. For larger surfaces, power tools such as oscillating or rotary devices save time and effort. If the grout is tough to remove, applying grout remover solutions can soften it, making scraping much easier and reducing the risk of damaging surrounding tiles.
Step 3: Clean the Tile Joints
After removal, ensure the joints are free from dust, dirt, and leftover grout. Use a brush or vacuum to clear debris, then wash the gaps with clean water. Allow the surface to dry completely, as moisture can weaken new grout and reduce adhesion.
Step 4: Apply New Grout
Mix the grout following the manufacturer’s guidelines to achieve the correct consistency, then use a grout float or applicator to firmly fill the gaps, ensuring an even and smooth finish.Wipe away excess with a damp sponge while leaving smooth, level grout lines for a neat finish.
Step 5: Sealing for Long-Lasting Results
Once the grout has dried, apply a grout sealer to protect it from water, dirt, and mold. Sealing helps maintain durability, prevents future discoloration, and extends the life of your bathroom grout, keeping your tiles fresh and secure.
4. Maintenance & Long-Term Care for Bathroom Grout
Proper maintenance is key to keeping bathroom grout strong and looking fresh. Use mild, non-abrasive cleaners and avoid harsh scrubbing tools that can damage grout lines. After every shower, dry tiles to prevent moisture from seeping into the grout, which can cause mold or weakening. Applying a grout sealer every 6–12 months adds an extra layer of protection against water and stains. Regularly check for early signs of cracks, gaps, or discoloration so you can repair them promptly and maintain a clean, durable tiled surface.
Regular Cleaning Tips
Keeping grout clean is essential for a fresh and long-lasting bathroom. Use mild, non-abrasive cleaners to avoid eroding the grout, and wipe down tiles regularly to remove soap scum, dirt, and moisture. Avoid harsh brushes or scrubbing pads, as these can scratch and weaken grout lines over time.
- Use mild, non-abrasive cleaners to protect grout from discoloration and erosion.
- Avoid harsh scrubbing brushes or steel wool that can scratch and weaken grout lines.
- Wipe down tiles regularly to remove soap scum, dirt, and moisture buildup.
Preventing Future Grout Damage
To keep grout in good condition, always dry bathroom tiles after use to prevent moisture buildup and mold growth. Apply a grout sealer every 6–12 months to protect against water, stains, and discoloration. Regularly inspect grout lines for early signs of cracks or gaps so repairs can be done promptly, ensuring long-lasting durability.
- Dry bathroom tiles after each use to minimize water penetration and mold growth.
- Apply a grout sealer every 6–12 months to protect against moisture and stains.
- Keep an eye out for early signs of cracks, gaps, or discoloration to address issues before they worsen.
5. Safety Guidelines for Grout Work
When working with grout, safety should always come first. Always wear gloves, masks, and protective glasses to protect your skin, eyes, and lungs from dust, debris, and chemical exposure. Keep the bathroom well-ventilated to reduce inhalation of fumes from grout remover solutions. Choose the right grout removal tool that matches your skill level to prevent accidents or tile damage. Never mix chemicals without following the manufacturer’s instructions, as improper handling can cause harmful reactions or injuries.\

6. Expert Tips for Best Results
For the best grout repair results, it’s important to know when to call a professional. Complex or extensive grout damage, especially in high-moisture areas, may require expert attention to prevent tile damage or mold growth. Choosing eco-friendly grout remover solutions is also recommended, as they are safer for your health and the environment while still effectively softening old grout. Additionally, using waterproof grout in bathrooms and kitchens helps prevent future moisture problems, cracks, and mold buildup. Working carefully in small sections, wiping away excess grout promptly, and following manufacturer instructions can also make repairs smoother and longer-lasting. These tips ensure your grout stays strong, clean, and visually appealing for years.
7. Common DIY Grout Repair Mistakes to Avoid
Many homeowners make simple mistakes that can shorten the life of repaired grout. Applying new grout without fully removing old, cracked sections can lead to weak adhesion and future damage. Using the wrong grout type for bathrooms, such as non-waterproof varieties, may cause cracks or mold growth. Skipping the sealing process leaves grout vulnerable to moisture, dirt, and stains, reducing its durability and appearance over time. Avoiding these errors ensures long-lasting, strong, and clean grout lines.
8. Danger & Risks in Grout Removal and Repair
Grout removal and repair can pose several risks if proper precautions aren’t taken. Chemical grout removers may cause skin burns, eye irritation, or breathing problems, making protective gear essential. Handling manual tools like scrapers can lead to cuts, while improper use of power tools increases the risk of accidents. Additionally, moldy or old grout can release spores that trigger allergies or respiratory issues. Ensuring good ventilation, wearing gloves, masks, and goggles, and following safe practices can help minimize these dangers and make the repair process safer.
Chemical Hazards
Grout remover solutions contain strong chemicals that can cause skin burns, eye irritation, or respiratory problems if not handled properly. Always read instructions carefully and wear protective gear to minimize exposure.
Tool-Related Injuries
Using manual grout removal tools like scrapers or saws can lead to cuts or scrapes if handled carelessly. Similarly, power tools such as rotary or oscillating devices can cause accidents if used incorrectly, so proper technique and focus are essential.
Mold Exposure Risks
Old or damaged grout may harbor mold and mildew, which can trigger allergic reactions or respiratory issues. Always wear a mask when scraping moldy grout and ensure the area is well-ventilated to reduce health risks.
Conclusion
Proper grout maintenance is essential for keeping bathroom and kitchen tiles strong, clean, and visually appealing. Regular inspections, timely repairs, and careful cleaning prevent cracks, mold, and discoloration, extending the life of your grout. Always follow safe practices-wear gloves, masks, and goggles, use the right grout removal tools, and work in well-ventilated areas. By applying these techniques and using quality grout and sealers, you can ensure long-lasting durability while keeping your tiles looking fresh and polished. Taking the time to repair and maintain grout correctly not only protects your home but also saves money on costly tile replacements in the future.